Hyve SDK - Construct 3 Setup Guide
This guide explains how to set up the Hyve SDK in your Construct 3 game for authentication and telemetry.
Latest Version: 2.1.2
1. Install the Hyve SDK Addon
- Download the
hyve-sdk.c3addonfile from the Hyve platform - In Construct 3, go to Addon Manager → Install new addon
- Select the
.c3addonfile - Restart Construct 3
2. Add Hyve SDK to Your Project
- Create or Open Your Project
- Right-click in the Objects Panel
- Select "Insert new object"
- Find "Hyve SDK" in the plugin list
- Click "Insert"
- Add the Hyve SDK object to your project
3. Configure the Hyve SDK
- Select the Hyve SDK object in your project
- In the Properties Panel, configure:
- Telemetry API Key: Your Hyve analytics API key for telemetry data
- Dev: Toggle between development (checked) and production (unchecked) telemetry endpoints
Environment Configuration:
- ✅ Dev = true (checked): Telemetry sent to development environment
- ❌ Dev = false (unchecked): Telemetry sent to production environment
Note: The SDK automatically handles configuration through properties - no manual initialization needed!
4. Basic Implementation

URL Parameter Authentication
The SDK automatically detects URL parameters from the main page URL. Add these events for authentication:
Event Sheet Setup:
Event: System → On start of layout
├─ Condition: Hyve SDK → Has URL parameters
├─ Action: Hyve SDK → Authenticate from URL with display name "Player"
└─ Action: Text → Set text to "Authenticating..."

Event: Hyve SDK → On authentication success (TRIGGER)
└─ Action: Text → Set text to "Welcome, " & HyveSDK.Username & "!"

Event: Hyve SDK → On authentication failed (TRIGGER)
└─ Action: Text → Set text to "Authentication failed: " & HyveSDK.LastError
Important: Use the TRIGGER events ("On authentication success"/"On authentication failed") instead of conditions to prevent infinite loops!
Custom Authentication
For authentication without URL parameters:
Event: Keyboard → On key pressed (Space)
├─ Action: Hyve SDK → Authenticate custom
│  ├─ Username: "testuser"
│  ├─ Signature: "your_signature_here"
│  └─ Message: "your_message_here"
└─ Action: Text → Set text to "Authenticating..."
5. Available Actions
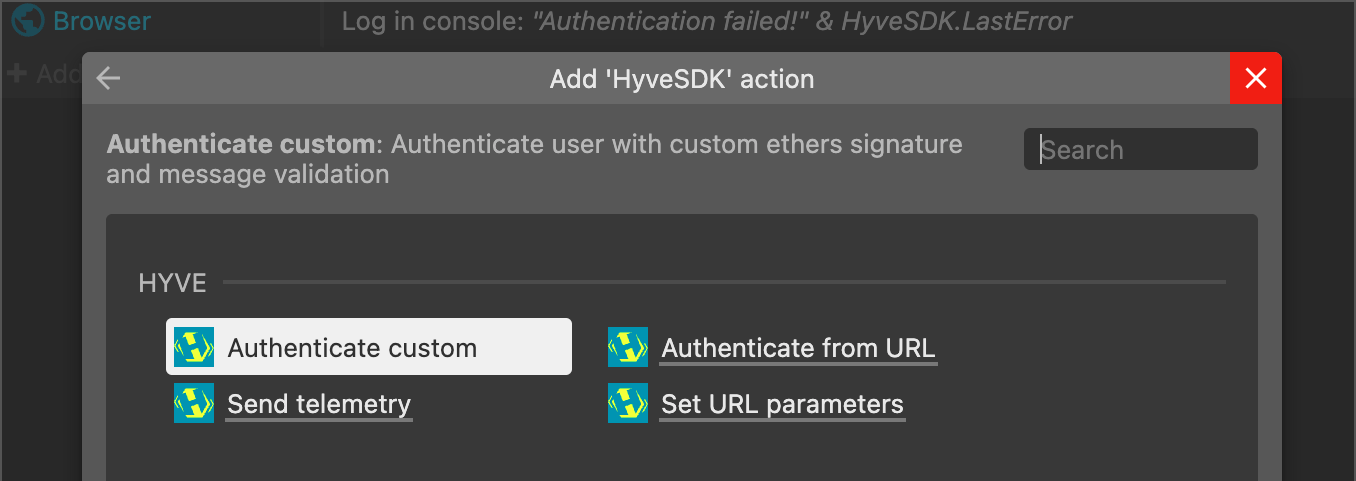
| Action | Description | Parameters |
|---|---|---|
| Authenticate from URL | Authenticate using URL parameters | Display Name (optional - user ID extracted from URL) |
| Authenticate Custom | Authenticate with custom credentials | Username, Signature, Message |
| Set URL Parameters | Manually set URL parameters for testing | Signature, Message, User ID |
| Send Telemetry | Send analytics event to Hyve backend | Event Location, Category, Sub-Category, Action, Sub-Action, Details, Additional Data (JSON) |
6. Available Triggers
| Trigger | Description | When Fired |
|---|---|---|
| On Authentication Success | Fired once when authentication succeeds | After successful login |
| On Authentication Failed | Fired once when authentication fails | After failed login attempt |
Note: These appear with arrow icons in the event sheet and fire exactly once per authentication attempt.
7. Available Conditions
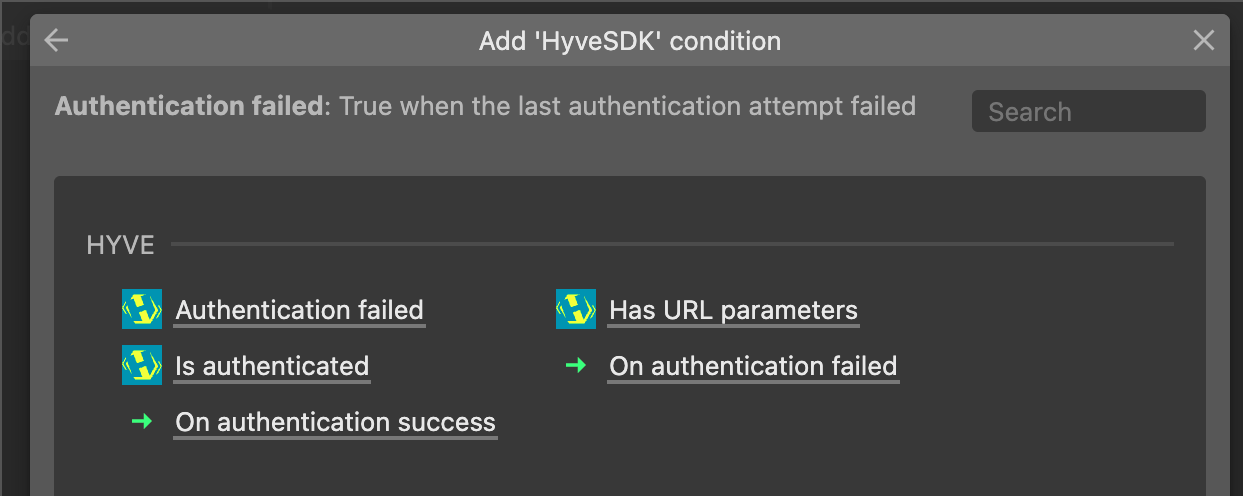
| Condition | Description |
|---|---|
| Is Authenticated | Check if the user is currently authenticated |
| Has URL Parameters | Check if URL contains required auth parameters |
| Authentication Failed | Check if the last authentication attempt failed |
8. Available Expressions
| Expression | Description | Returns |
|---|---|---|
| HyveSDK.Username | Get the authenticated username | String |
| HyveSDK.URLSignature | Get signature from URL parameters | String |
| HyveSDK.URLMessage | Get message from URL parameters | String |
| HyveSDK.URLUserID | Get user ID from URL parameters | String |
| HyveSDK.LastError | Get the last error message | String |
| HyveSDK.SessionID | Get the current session ID | String |
9. Example Event Sheet Setup
// Check for URL authentication on startup
Event: System → On start of layout
├─ Condition: Hyve SDK → Has URL parameters
├─ Action: Hyve SDK → Authenticate from URL with username "Player"
└─ Action: Text → Set text to "Authenticating from URL..."

// Handle successful authentication (TRIGGER - fires once!)
Event: Hyve SDK → On authentication success
├─ Action: Text → Set text to "Welcome, " & HyveSDK.Username & "!"
└─ Action: Hyve SDK → Send Telemetry
   ├─ Event Location: "game"
   ├─ Category: "authentication"
   ├─ Sub-Category: "success"
   ├─ Action: "login"
   ├─ Sub-Action: "url_auth"
   ├─ Details: "User successfully authenticated"
   └─ Additional Data: ""

// Handle authentication failure (TRIGGER - fires once!)
Event: Hyve SDK → On authentication failed
├─ Action: Text → Set text to "Login failed: " & HyveSDK.LastError
└─ Action: Hyve SDK → Send Telemetry
   ├─ Event Location: "game"
   ├─ Category: "authentication"
   ├─ Sub-Category: "failure"
   ├─ Action: "login"
   ├─ Sub-Action: "url_auth"
   ├─ Details: HyveSDK.LastError
   └─ Additional Data: ""

// Manual authentication (optional)
Event: Keyboard → On key pressed (Enter)
├─ Condition: System → Invert → Hyve SDK → Is authenticated
├─ Action: Hyve SDK → Authenticate custom
│  ├─ Username: "testuser"
│  ├─ Signature: "test_signature"
│  └─ Message: "test_message"
└─ Action: Text → Set text to "Authenticating..."
10. URL Parameter Format
When using URL authentication, your game URL should include these parameters:
https://your-game-url.com/game?signature=SIGNATURE&message=MESSAGE&userid=USER_ID
Example:
http://localhost:3000/game?signature=abc123&message=hello&userid=player1
11. Telemetry Usage
Track player behavior and game events with detailed analytics:
Basic Telemetry Example
// Track game start
Event: System → On start of layout
└─ Action: Hyve SDK → Send Telemetry
   ├─ Event Location: "main_menu"
   ├─ Category: "game_flow"
   ├─ Sub-Category: "session"
   ├─ Action: "start"
   ├─ Sub-Action: "game_launch"
   ├─ Details: "Player started new game session"
   └─ Additional Data: ""

// Track player actions
Event: Mouse → On object clicked (PlayButton)
└─ Action: Hyve SDK → Send Telemetry
   ├─ Event Location: "main_menu"
   ├─ Category: "ui_interaction"
   ├─ Sub-Category: "button"
   ├─ Action: "click"
   ├─ Sub-Action: "play_button"
   ├─ Details: "Player clicked play button"
   └─ Additional Data: '{"button_id": "play", "screen": "main_menu"}'
Advanced Telemetry with Custom Data
// Track game completion with score
Event: Player → Score reaches 1000
└─ Action: Hyve SDK → Send Telemetry
   ├─ Event Location: "game"
   ├─ Category: "gameplay"
   ├─ Sub-Category: "completion"
   ├─ Action: "level_complete"
   ├─ Sub-Action: "victory"
   ├─ Details: "Player completed level with high score"
   └─ Additional Data: '{"score": ' & Player.Score & ', "level": ' & CurrentLevel & ', "time_taken": ' & GameTime & '}'
12. Troubleshooting
Common Issues and Solutions
| Issue | Solution |
|---|---|
| "Can't see authentication triggers" | Triggers are now fixed in v2.1.0 - they appear with arrow icons in condition picker |
| "Authentication success logging infinitely" | Use "On authentication success" TRIGGER instead of "Is authenticated" condition |
| "Missing URL parameters" | Check that your URL contains signature, message, and userid parameters |
| "Port conflicts in exports" | Use the updated export scripts with proper socket reuse (v2.1.0+) |
| "Addon not loading" | Check browser console for errors, ensure Construct 3 v2 compatibility |
| "Telemetry not sending" | Verify API key and URL are set in addon properties |
Debugging Tips
- Check Browser Console: Look for authentication and telemetry messages
- Use Trigger Events: Always use "On authentication success/failed" triggers, not conditions
- Test URL Parameters: Verify signature, message, and userid are in the URL
- Verify Properties: Ensure telemetry API key and URL are configured
- Check Network Tab: Look for successful/failed API requests
13. Next Steps
Once authentication and telemetry are working:
- Analyze player behavior through telemetry data
- Add leaderboard integration
- Implement player progression tracking
- Add multiplayer features
- Integrate with Hyve's social features
For more advanced features, refer to the Hyve SDK documentation at https://docs.hyve.gg
Release Notes
🆕 What's New in Version 2.1.2
- ✅ Dev Environment Toggle: Added a "Dev" boolean property to easily switch between development and production telemetry endpoints
- ✅ Automatic URL Selection: When "Dev" is checked (default), telemetry goes to dev environment; when unchecked, it goes to production environment
- ✅ Simple Configuration: No need to manually change URLs - just toggle the checkbox in plugin properties
🔄 Previous Updates (Version 2.1.0)
- ✅ Fixed Trigger Visibility: "On authentication success" and "On authentication failed" triggers now properly appear in Construct 3
- ✅ Eliminated Infinite Authentication: Added proper guards to prevent repeated authentication events
- ✅ Improved Event Handling: Triggers fire exactly once when authentication succeeds/fails
- ✅ Enhanced Port Management: Fixed port conflicts in export scripts with proper socket reuse
- ✅ Construct 3 SDK v2 Compliance: Full compliance with Construct 3's v2 addon standards